Image Map

Friday, December 30, 2011

5- Year Anniversary Gifts

My husband and I celebrated our 5 year anniversary yesterday! 

I love that man :)

He always gives me sweet gifts. He's definitely gotten better at gift giving. (He used to buy me a couple books from the bargain section at the bookstore. It's better now.)

Look at the sweet, thoughtful gift he gave me this year:


A picture frame with a picture from each year of our marriage! (I added the years on Picnik, just as a reference.)

I love this gift. He also wrote a favorite memory from that year on the back of the frame. Not to mention he took me here:


The Biltmore Estate! He's such a good husband.


I started on his gift around the beginning of December. It was supposed to be a Christmas gift but I had already made him a pillowcase (out of minky...soft) so I decided to make it an anniversary present. 


A T-shirt blanket! A BYU T-shirt blanket, to be exact. I'm really happy with how it turned out. 

Just a few tips/tricks for a T-shirt blanket:

- I used a fleece blanket for the backing that I found at Wal-Mart for $2. This way my husband will use it instead of just look at it.


- Use some sort of stabilizer on the backs of each T-shirt. This is a trick my mom told me about. The stabilizer makes the T-shirt non-stretchy and a lot easier to deal with. 


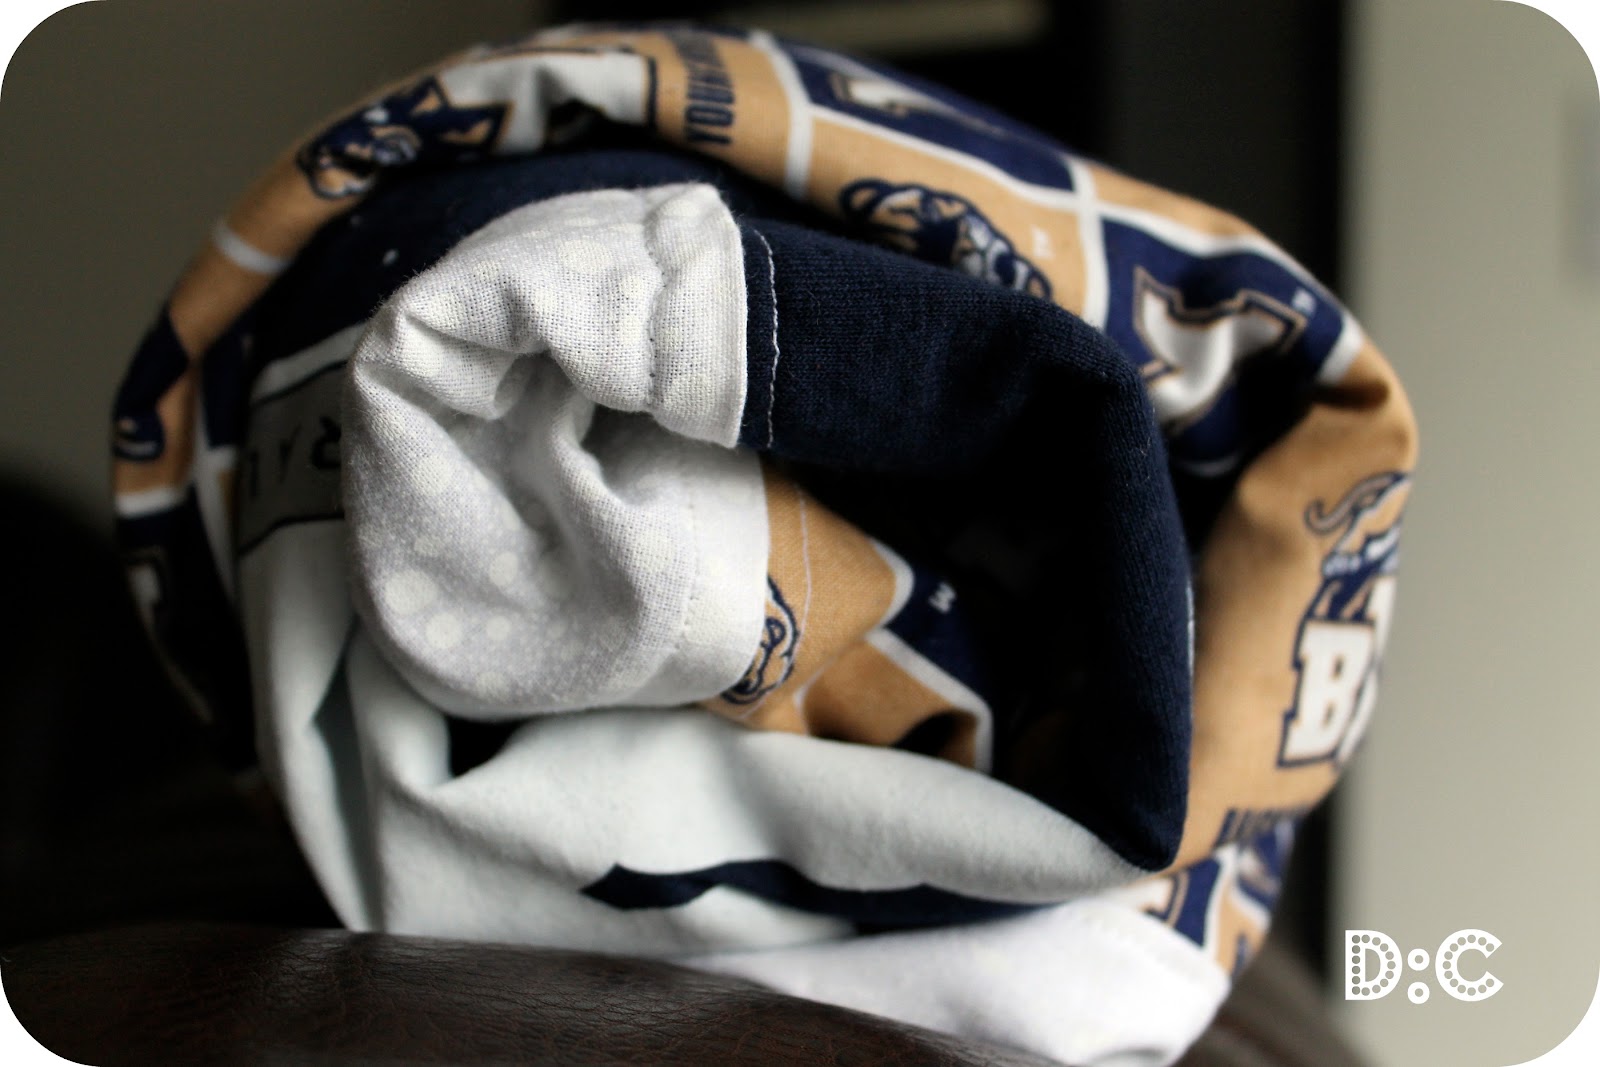
- Another way my husband will use it: I didn't add batting. Doing this makes the blanket a lot lighter so that it's easier to fold up or to throw on top of someone. Another trick told to me by my mama. 


 - I used this tutorial from YouTube for making and attaching my borders. And look: beautiful mitered corners!!

I also made him a framed memory (about the proposal):


Sharing here: Naptime Crafters, Mommy by Day, Crafter by Night,


Thanks for dropping by!!


Wednesday, December 28, 2011

Christmas Decor Top 10

How was your Christmas??!! Did you survive? I'm guessing you did, if you're reading this. Well, congraaaatulations! Now it's time to plan for next year! Ha! Just joking with ya. Take a day or two off. 

I sure did! We went to Charlotte on Christmas day and then my husband planned a getaway for us for the next two days to celebrate our 5-year anniversary... SO SWEET. We went to the Biltmore Estate in Asheville, NC. It was AH-MAZING.

Anyhoo...last night I was thinking how I kind of already want to take down the Christmas stuff and move on to something else...is that bad? Oh well. So I wanted to share my Christmas Decor Top 10 before I took everything down. I'll count down to my #1 favorite decoration this year.


10. My "Christmas Time" countdown. This is a fun little reminder of how close the holiday is coming. I think I made it at a Super Saturday a while ago. 


9.  The Stocking Station. I had to put our stockings on the little coat hanger by the door since we don't have a mantle. It works. I also want to MAKE some stockings...maybe next year.


8. BYU light box. I got this from the Craftaholics Anonymous Craft Exchange. I did it in June (I think it was June) and my partner gave me this awesome light! Love it.


7. "Cowboy Christmas": We have to showcase Drew's roots!


6. The JOY blocks I think I made at a Super Saturday (the other side says "BOO"). The little nativity is the first one I ever bought. I got it from the BYU Bookstore.


5. Luke got this awesome Nativity set from his grandma last year. He loves playing with it & this year Gracie did too!


4. My Christmas centerpiece. I used this to decorate for my ward Christmas party, so I just transferred it to my table afterward. Plus, I made that table quilt, so it's extra special.


3. I love this nativity. It's so simple & sweet. For some reason it's one of my favorite decorations...besides the obvious reason: being reminded what the real reason for Christmas is.


2.  My grandma sent me this needlepoint Christmas canvas a year or two ago. Isn't it awesome? I think either my grandma or my great-grandma made it.


1. My favorite Christmas decoration this year is the one I MADE this year: Hand print ornaments! I just traced my babies' hands and cut them out of felt and made an ornament. I would love to do something like this every year to remember how little & sweet their hands are that year.


Thanks for dropping by!


Wednesday, December 21, 2011

Personalized Grandparent Gift

We always give my husband's grandparents framed pictures for Christmas. We always try to figure something else out to give them, but what else do they want? So it always goes back to pictures of us & the kids. This year we were trying to think of something a little different and we were browsing Pinterest. 

We came across this photo

Found here


We liked the idea but also wanted to personalize it. And we did just that...plus changed it up a little.


Our signs say "We" "Love" and then "Grandma Olson" and "Grandma & Grandaddy Free." I just used a frame I had and used dry erase marker so that I could change the names on it. We took the pictures on Sunday and were able to print the pictures & buy the frame the next day!

Easy grandparent gift!


Sharing here: 36th Avenue, Fireflies & Jellybeans,


Thanks for dropping by!!


Monday, December 19, 2011

Baked Egg Rolls


 I am a BIG fan of egg rolls. Other types of Asian food...not so much. Unless it's from Panda Express :) On my recent visit to Utah, my sister-in-law showed me how to make some delicious egg rolls. Here is the recipe:

1 lb turkey
beef bouillon paste or cubes
1 bag of coleslaw
1/2 onion, chopped finely
2 eggs
Egg Roll wrappers


I cooked my turkey meat before I made the mixture, but if you're going to fry yours in oil, I guess you can do raw meat. The meat will cook while being fried. However, I like my egg rolls baked, so I cooked the meat beforehand. As your meat is cooking, season it with the beef bouillon. Once your meat is all cooked (no pink) throw it in a big bowl. Add the coleslaw, onion, and 1 egg. Toss together. Grab the egg roll wrappers. Place one in front of you so it looks like a diamond. Place a tablespoon of the inside mixture on the corner closest to you. Start rolling it up. Once you get about halfway up the egg roll wrapper, tuck the sides in. Have the 2nd egg cracked & in a bowl next to you. Dip your finger in the egg and rub it on the top corner of the wrapper. Continue rolling the egg roll up. The egg will help it stick and stay closed. 

Heat the oven to 400. Place the egg rolls on a baking sheet sprayed with cooking spray. I cooked mine for 8 minutes on one side and then flipped them and did another 5 mins. 

Less fattening than frying them up in oil and in my opinion just as tasty!!

Thanks for dropping by!


Friday, December 16, 2011

Cookie Swap!

The holiday season definitely has some ups and downs to it. I feel like all the baked goods and desserts can be both good and bad. I love eating them and giving them out but I hate the poundage they put on me! 

Oh well, that's what New Year's Resolutions are for, right?

In the spirit of not caring about the holiday weight gain, my friend hosted a Cookie Swap at her place and it was sooo amazing! She went all out for us.


 First of all, there was a Hot Chocolate bar, with not only homemade Crock Pot hot chocolate, but homemade Peppermint Marshmallows.  There was also toffee bits, dark chocolate kisses, Raspberry Cheesecake creamer, and whip cream. I think this was my favorite part. The hot chocolate was so rich and creamy. (Find the recipes on her Pinterest.)

There was also sugar cookie decorating, which was fun. There were 5 of us girls and it was fun (and funny) seeing the different ways we decorate.


Not only did she have these things, but she also made us lunch! And she made one of my favorite dishes...QUICHE!! Yum. I haven't had quiche in at least 5 years because my hubby isn't a huge fan of eggs (he ate them too much of them on his mission and got sick). So I was stoked to see the quiches there. They were a simple (and DELISH) cheese and egg quiche.


I just got a shot of one of the plates of cookies that were there, but there were tasty treats! These are snickerdoodles and there were also chocolate chip pumpkin muffins, chocolate chunk cookies, and then the ones I made, oatmeal chocolate chip cookie sandwiches.


And of course I had to take some picture of the cuties there!

Our host's daughter, Carolina


Mia and my daughter, Gracie. I didn't get a shot of the two-year-old boys because they were running around like crazy people!


Lastly, we had adorable to-go boxes for the cookies we swapped (By Martha, of course). YUM!!


Sharing here: Toys in the Dryer30 Handmade DaysNaptime Crafters,

Thanks for dropping in!


Tuesday, December 13, 2011

Christmas Party Table (Christmas Party Decor: Part 2)

Our Christmas party was this last Saturday and it was really pretty fun! We sat by friends, ate from a pasta bar, and had a mini talent show. Luke was only interested in the dessert bar and Gracie stole a cookie from a friend's plate. Typical.

I was in charge of decorating a table. Here is how my table turned out:


I'm really pleased with how it turned out! There were candy canes by each napkin plus small candy rings around the centerpiece, so it was a very kid-friendly table. And as it turned out, a family with 4 little boys sat there! I was happy that I didn't have any candy to take home.


And it was all cheap. Or budget friendly. Cheap sounds bad. Remember that Christmas quilt? No? See more here


I think my favorite Dollar Store find were these bells. Nine for a dollar and soooo cute! 

The best part of the whole evening? Spending it with my favorite people. The hubs and baby girl were decked out in red (see more about the ruffle skirt here).

And my sweet little boy. 


Linking Up: Ginger Snap Crafts, Fabric Bows & MoreSew Woodsey, Someday Crafts, Lil Luna,The Artsy Girl Connection,

Thanks for dropping by!


Friday, December 9, 2011

Dolllar Store Christmas Party Decor: Part 1

It's hard to justify spending tons of money on party decor this time of year because you're spending so much on gifts already. Well,  I signed up to decorate a table at my church's Christmas party a while ago & I got pretty excited about it. Originally I wanted to do teal & red, but after seeing all the treasures at the dollar store/bargain stores, I went in a little different direction.

We needed a centerpiece for the table. Well, I couldn't really just plop a centerpiece down, could I? It's Christmas...this table needs to be pretty! I needed table settings for 8 people.

I knew I needed to keep it cheap and simple. Almost everything I'm using came from the dollar store/bargain store or I already had it. 

Here's Part 1 of my "Dollar Store Christmas Party Decor"!


Look at these goodies! Plates, napkins, and cups I got from a store called Ollie's, which is a bargain store. The prices were $.99 (cups and small plates) & $1.60 (large plates).The photo holders came from the dollar store & I printed the printable (from here) from Wal-Mart for I think $.28 each.


The little jingle bells I got from the dollar store. You get 9 for a dollar. Such a good deal! I'm using them as napkin rings.


The glitter snowflake coasters are from the dollar store. There were 12 in a pack: 6 glittery and 6 plain. I got about 70 of those candy canes from Ollie's for $.99.

So far, so cheap! The party is tomorrow night, so I'll post more decor tomorrow. Happy party throwing!


Thanks for dropping by!


Tuesday, December 6, 2011

Really Ruffles Skirt

Disclaimer: I have a little baby girl.
 If you've ever had a baby girl or if you have one that you're close to, you'll understand this post. 

I wanted to buy my baby girl a Christmas dress but my hubby claims that she has too many clothes already (which might be true, but what's one more dress?).

I took matters into my own hands. I pulled out my scraps and started sewing. I had looked on Pinterest and found this tutorial from Simple Simon & Co. and this tutorial from Sweetie Pie Bakery. I read through them before I started my baby's skirt. Here's what I came up with:


The only problem I encountered was that I was out of white fabric. So I had to use some hot pink fabric that I had as the base of the skirt. Most of the time you won't see it, but every now and then it'll peek out.


It also felt like it took me a million and a half years to finish those ruffles. But they are sooo worth it! I love ruffles, especially on baby buns.


Now she has a skirt to not only wear on Christmas day, but she WILL wear it to the church Christmas party, to see Santa, and any other Christmas activity we do. It took me too long to see her wear it only once.


And she's just too cute in it!

Thanks for dropping by!