Image Map

Monday, October 7, 2013

Portable Growth Chart

A little while ago, I was approached by a representative from Icon Wall Stickers. They wanted me to review a wall decal and I was so excited. My only problem is that I live in a rental. Which means I would have to take my pretty decal off when I leave the rental and then it would be ruined!

So I scoured the wonderful website and obviously found a million I WANTED but one that would be perfect for my portable lifestyle.


Their vinyl is just so cute and easy to use. And what I was surprised at was how reasonable the prices are! Once we're in a house for a long while, I'm going back to their website to see what I want to put on  my wall! Seriously, they have some cute vinyl for your house.

So for my Portable Growth Chart, I picked up a huge canvas from Michael's (use a coupon!) and some fun paint and painted the canvas several times.


Next I taped the vinyl to the canvas to picture how I wanted the end product to look. What was nice about the product I got from Icon Wall Stickers is that I could cut it and adjust it to how I wanted it.


Then I applied the vinyl by using a hard card (credit cards work great) to rub the vinyl on. It really couldn't be easier!


And that was it! I have an awesome growth chart for my 2 growing kiddos and I'm so excited about it. I've been wanting to do one of these for ages and now I have an awesome one thanks to Icon Wall Stickers! Seriously, go check them out!


Love it!


Sunday, September 29, 2013

Halloween Neighbor Gift

Halloween time isn't really known for gift giving, but I feel like Halloween kind of kicks off the holiday season. First it's Halloween, then Thanksgiving, then Christmas... so why not celebrate the start of the holiday season than with giving a gift!


One of my favorite recipe blog is Chef in Training and she has a delicious recipe for Pumpkin Chocolate Chip Pudding Cookies. When you layer the ingredients (well, most of them) in a jar, it looks cute and makes a fun but not too spooky neighbor gift. 

So here's what I did. It's all about the layers & packing in each layer. Packing it in ensures that all the layers will fit.

1. Start off with the flour. You'll need 2 1/4 cups, all packed in nice and tight.

2. Second layer is the brown sugar. You'll need 3/4 cup. Remember, pack it in!

3. Third layer is a couple of them together. I put the sugar (1/4 cup), then the baking soda on top of that (1 teaspoon), and a small package of Pumpkin Spice pudding on top of that. 

4. The final layer is the chocolate chips. You'll need a cup, unless you can fit more, in which case, more chocolate chips is always good!

That's all the layering you do! It's such a simple gift and it would really make your neighbor's day.


I added some tags to write the baking directions on them. You'll have to make sure to include the ingredients that aren't in the jar, like the eggs, vanilla, and butter on the tag so they know what they'll need to make the cookies. I also got some Halloween fabric to add to the top of the jar, which adds a cute Halloween-y touch.

Enjoy!


Thursday, September 12, 2013

How to Cut Burlap (without making a HUGE mess)

I recently learned how to cut burlap and it kind of blew my mind. I HAD to share it, because it is just so awesome! 

I love the way burlap looks but I don't use it a whole lot. Reason? It's messy. Like, really messy. But recently I learned how to cut it and I'm a lot less scared of it! Lemme show you:

Step 1:

Simply cut a little slit into the burlap, where there is a white thread going across.


Step 2:

Grab a piece of the burlap that comes unraveled because of the slit. Just grab one little thread. 


Step 3:

Pull that thread!! Warning: It will break if you pull too hard. Pretend you're trying to make a ruffle with it. It will start bunching up but that's good!


After you have pulled that thread of burlap out completely, you'll notice you've made a little track-looking space in the burlap:


Step 4: 

Cut along that track!


And there you have it! Now, don't get me wrong, this is not an entirely mess-free project. There will always be little burlap hairs when you deal with burlap but this definitely cuts down on the mess. And something that makes it so I don't have to clean so much later is a winner to me!


Wednesday, September 4, 2013

Colorful Chevron Quilt

It must be baby season! This is the second chevron baby quilt I've made recently. I also have 2 sisters-in-law that are either pregnant or recently had a baby. I must not have caught baby fever. Not yet, at least ;)

With that being said, I don't think a baby can have enough blankets. They spit up ALL.THE.TIME (or was that just mine?) and you end up with a pile of dirty blankets, scrambling for another one so they can have tummy time... Anyway, the point is, one of my favorite things to make for babies is a quilt.


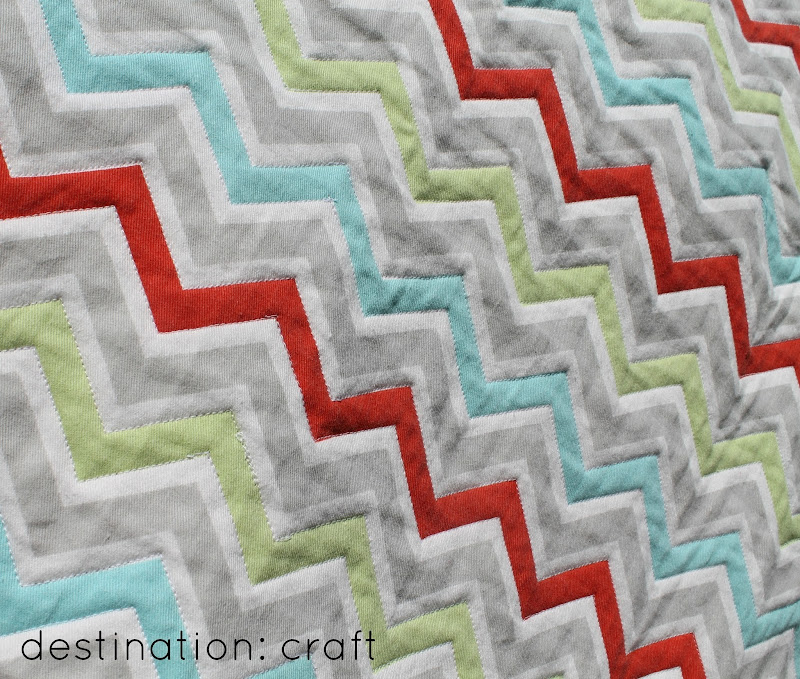
For this quilt, instead of piecing the quilt together like I did for THIS chevron quilt, I bought chevron fabric. I bought mine from Fabric.com, but there are lots of awesome fabric websites with chevron fabric. Then I made a back, put together the chevron fabric for the top, the batting, and the back, and quilted the zig zags. I love how it turned out! It's the quilted look without doing all the hard work! (Well, some of it, anyway.)


I added a big chunk of blue polka dot fabric to the back to add a little interest. I like it better than a big piece of the same color for the back. The binding I just bought from Joann's and it matched perfectly! Score. This quilt came together really quick, so if you need a baby gift in a hurry, I'd highly recommend buying some chevron fabric & quilting over it!


Love that quilted look!!


Friday, August 23, 2013

Introducing...CafePress!


I was recently introduced to an awesome website that does custom designs on, well, just about ANYTHING. Seriously. They have just about everything you can imagine AND you can get whatever you want written/printed on it! 

Let me just take you on a little tour of CafePress:


- Custom T-Shirts:  
They have an amazing array of t-shirt designs to choose from. But what's super awesome is that you can design your own custom T-shirt. They have options for everyone. Just choose the style and color and you can go from there.


If you're looking to customize an article of clothing other than a shirt they also have sweatshirts, tank tops, baseball jerseys, dry-fit shirts, polos, pajamas, underwear, maternity, plus-sized, workwear, and yoga pants. The options seem endless!!

-Gifts: 
Okay, so if what you're looking for is more gift-oriented than clothing-oriented, they've got you covered there, too. They have a whole section of personalizable gifts. You can shop by recipient, such as men, women, kids, pets, and teachers or you can shop by occasion, such as back to school, marathon, anniversary, birthday, or wedding. 

Here are some personalizable gifts I found on CafePress that I love!

1. Owl Glass Cutting Board
2. Pins
3. Canvas Pillows
4. Beach Totes
5. Christmas Ornaments
6. iPhone cases


Invitations: 
They also carry cards you can personalize and order for any occasion, such as baby's 1st birthday, birthdays, and Christmas.


Okay, have I at least convinced you to at least go peruse the website? I KNOW there's something there you'll want to order because every time I get on it I see something new and awesome I want!


Wednesday, August 21, 2013

Easy Chevron Baby Quilt

One of my good friends is expecting a baby boy in just a couple of weeks and so I made her a baby quilt for when her little guy decides to make his appearance (she's pretty pumped to be done with this pregnancy!). 


She picked out the colors and the back fabric and she has good taste, because it turned out lovely! (If I do say so myself.)

So, to start I purchased:

- 1 yard white broadcloth
- 1 yard gray broadcloth
- 1 yard gray minky
- package of crib-sized batting 
(use a coupon or wait until they go on sale!)

I washed my fabrics, ironed them, and then cut the white and gray broadcloths into 6-inch squares (set the minky aside for now). I just used up all the fabric, I didn't count how many squares I made.


Then I cut those squares across so they formed triangles.


Then you need to sew one white triangle to a gray triangle to reform a square. Iron the back so they lay flat. Then lay them out on your floor to form the pattern, because trust me, it can get confusing!(Obviously in the picture below I hadn't ironed yet!)


Tip: Your squares will have a little bit of fabric that goes over the sides. I chopped those off so they would sew together a little better. See picture below.


Then sew the squares together to form rows. Then sew the rows together. Once I was done with that, I laid the quilt top on the batting to quilt it. 

Tip: I pin my quilt top to the batting to keep it in place. It helps the back stay in place so there's no tucking when you can't see the underside. It takes a little time but trust me, it's worth it!


I only quilted the white zig zags but you can also quilt the gray ones if you want. Then once it was all quilted I laid it down on the wrong side of the minky fabric. Depending on the width you want for the border, cut the minky respectively. I wanted a 2-inch border so I cut my minky 4 inches longer than the where the edge of the quilt is. Kind of confusing, sorry.


So above is the picture of the minky 4 inches wider all the way around the quilt. Then I folded the minky over once to line up with the quilt edge,


Then I folded it over once more to be on top of the quilt. That's your quilt border. It's just an alternative to bias tape.


But I wanted as much softness as possible, since it's a baby blanket, and a minky border just seemed the best option. Then I stitched up the border, sewing along the edge closest to the inside of the quilt. And then you're done! Not so hard, right?


I love how it turned out! And I think my friend liked it, too, which is what really matters.


Ahhh, sooo soft!!


Saturday, August 10, 2013

A Cinderella Rocking Chair Story

Once upon a time I bought an ugly rocking chair from a consignment sale. It was only $25! How could I pass that up?!


It was beat up and unappreciated (probably) and the fabric was just...ick.

So I took it under my lil wing and decided to make it my own. I gave it a little makeover. Trust me, the rocking chair and I are much happier now because of it. And so is my husband. He hated that ol' fabric. I bought a pattern but I could have just used the old fabric and traced that.


I had a hard time finding just the right fabric. This chair is in one of the main parts of my house, so I wanted something cute but not flashy. I bought some fabric online but when I opened it the color was way brighter than I had anticipated. Fail.


Then I went to trusty ol' Joann's and found some warm, buttery yellow fabric that I loved. And I covered that chair. I covered it good.


Doesn't it look better? I also made a fun little pillow. You know, for back support. Or just to be cute. See how cute it is??


Tuesday, August 6, 2013

Favorite Things Party

I know most of you have probably heard of a Favorite Things Party because they have gotten really popular on Pinterest. I remember hearing the idea about 2 years ago but I just recently teamed with a friend to put one together. And it was AWEEESOME!!!


So here's the lowdown: Every girl brings 5 of her favorite things (Sidenote: all but one of us brought 5 of the same things. One girl brought 5 different things and I personally think that way is better!). Anyway, you bring 5 things under $6 (or whatever budget suits you). 


Then when the guests arrive they write their names on 5 slips of paper and put them in a bowl. Each girl stands up, explains her favorite thing and why it's so awesome, and picks out 5 names out of the bowl. Those 5 girls get the favorite thing! The girl who gets pulled last goes next with her favorite thing.


I don't think I can explain to you how much I loved this party! I think we'll be doing another one of these around Christmas time. Wouldn't that be so much fun?!! We also asked each girl to bring one of her favorite snacks to share. Some of the snacks were popcorn, Airheads, carmelitas, ice cream, cheese...


I'm kind of proud of my board, so I had to share. I drew this freehand on a dry erase board I had lying around. I got the idea from THIS


Our table spread was amazing! We kept the decorations to a minimum and it helped keep the feel of the party fun and casual. 


Each girl got a bag to take all her goodies in. It was a lot better than trying to carry out the loot in your arms!


Here's some of the loot! There was sleek hair spray, Oreo truffles, Meyer's counter top spray, Trader Joe's Mini Peanut Butter Cups, French soap, Honest hand soap, Nsync cds, and more!! If you're thinking of throwing a Favorite Things Party, stop thinking about it and do it! You won't regret it!!

Two other helpful links were HERE and HERE.

Need different party ideas? Check out my Party Ideas Pinterest Board!


Sharing here: Ginger Snap Crafts, DIY Dreamer, Rae Gun Ramblings,