Image Map

Thursday, December 27, 2012

The Brynne Dress

I bought this pattern FOREVER ago. I made it as a present for last Christmas for my daughter but she's so dang petite that it didn't fit her for, oh, 10 months. She's a pixie.


I am in no way being endorsed by her, but Brynnberlee Designs has some great patterns for little girls. Super easy and cute result. I used the Brynne Dress pattern.

Front and back shot:


I love the little sash that ties in the back and the puffed sleeves (any Anne of Green Gables fans out there?). Plus, the little girl in the dress is pretty dang cute, too.


Sharing here: Tatertots & Jello, One Artsy Mama


Thursday, December 20, 2012

Last Minute Cookie Gift

I'd like to introduce my newest contributor, Kellee!!

She's actually one of my best friends...ever. And we live far, far apart, which may be a good thing because if we lived closer we'd spend a lot of money on crafts. She has her own blog, called Twigs & S'mores. Go check it out!

She's an awesome baker and she's going to help me out and be my new food contributor! Sweeeet!!

I'll let Kellee take it away!
*******************

"Last Minute Gift Idea - Cookie Mix"


Happy Holidays ya'll! I hope that you have completely immersed yourself into the Holiday season and have really enjoyed all of the magic that this time of year brings.  

I made sure that this year I started decorating for Christmas even before Thanksgiving so that I could REALLY enjoy this time of year.  The reason why I did this is because it seems like Christmas comes and goes ridiculously fast! So for those of you who didn't start decorating before Thanksgiving and who need a last minute present idea, this simple and cheap project is for you.

First off, this project is all about deception.  People are going to think that you slaved away putting together a "homemade" cookie mix for them when in actuality, you are just giving them a pre-done mix from good 'ol Betty Crocker.  

Now some of you at this point may be turning up your nose at this project because it's not "homemade".  But hear me out! I have cooked with some of these mixes and they are awesome! I love to cook and bake and I find that these mixes are very close to "homemade" tasting.  

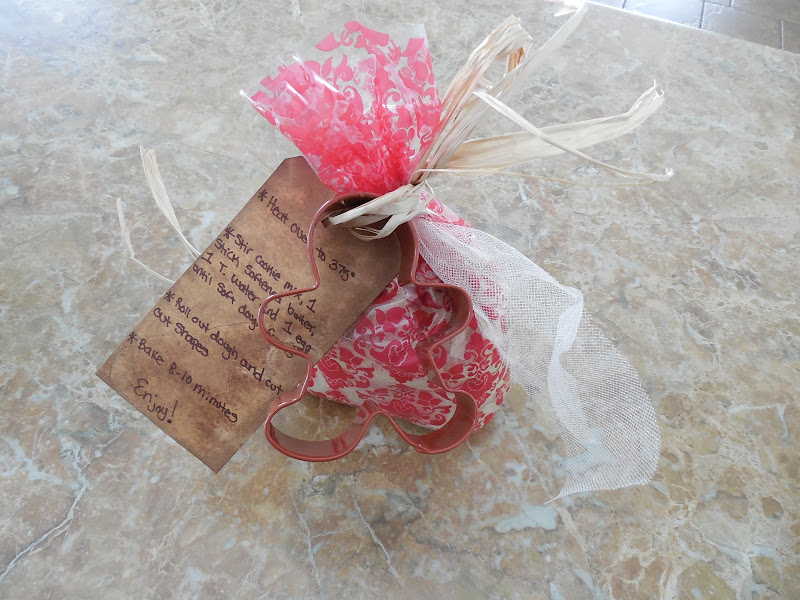
For my cute little cookie mixes I used her Gingerbread mix (oh my heavens does it smell and taste delightful!) but I only have a picture of the Pumpkin Spice because I accidentally deleted my Gingerbread picture. 


Any who, for this simple project I just plopped the cookie mix into an adorable red damask plastic bag from Michaels (I believe it was 24 for $1.99), wrote out a tag with the instructions and then tied a cookie cutter onto the bag with some tulle and raffia.  And viola! I have an easy and great present to give! 


Thanks, Kellee!! Awesome last-minute gift!!

Sharing here: NY Melrose Family


Tuesday, December 11, 2012

Pleated Christmas Tree Skirt

Are you so excited for Christmas?! I know I am! And...around this time I always feel a little overwhelmed. But mostly I just love this magical time of year.

My friend and I decided that this was the year we were going to make tree skirts. And we both love things girly & frilly, so we made a great team!


I bought this tree skirt from Target for, like, $5 one year and it's been a trooper but I needed something a little prettier this year. I looked on Pinterest and decided I loved the look of the ruffled tree skirt but I decided to take my own spin on it and I created the Pleated Tree Skirt.

Ahhh, so much prettier, don't you agree??

So here's how I made it.


I ended up using a little over 5 yards of fabric. Yes, I just said 5 YARDS. I cut my fabric into 3 inch strips. Then I started hot gluing them to my old tree skirt. I would lay the strip down and then fold it back onto itself to create the pleated look.

After you've done a million several rows and are all finished, you're ready to add some pretty ribbon.

My tree skirt already had Velcro closures so I just glued pre-made bows on top of where the Velcro pieces are.

Then I added ribbon around the top of the tree skirt, where it'll meet up with the tree. I gave it a nice, finished look.


I just love how it looks! The pleated layers are just oh-so-gorgeous.


However, if you're feeling more in a ruffle mood than a pleated mood, check out how my friend's skirt turned out. I LOVE her ruffles!!

Aren't those ruffles to DIE FOR?! She did hers with a glue gun, too! And trust me, you'll need a back rub afterwards.


Sharing here: Lil Luna, Ginger Snap Crafts, Homemade Ginger, Dixie and Dottie, DIY Dreamer, Mercy Ink, Top This Top That, 36th Ave,     

Thursday, December 6, 2012

Christmas Cookies

I have become a little obsessed with making sugar cookies and learning how to decorate with royal icing. I don't know why I've never tried this before but it's probably a good thing. I'm pretty sure I'll gain 10 pounds if I keep making and decorating cookies!


I got THE BEST recipe for sugar cookies from Glorious Treats. I also got the frosting recipe from her website as well. Have you seen her cookies? They're gorgeous!

I still have a lot to learn but I'm having fun practicing!


Cute, right? And the cookies and frosting are so delicious! 


Nothing says Happy Holidays more than a pretty plate of cookies!

Sharing here: Love and Laundry, One Artsy Mama, See Vanessa Craft, Craftomaniac,  


Tuesday, December 4, 2012

Zig Zag Quilt

Need a great Christmas present? Or how about a baby shower present?

My husband's boss is pregnant with her first baby and my husband casually mentioned he'd love it if I made her a quilt. He just underestimated how much effort I put into it. When I was finished and I showed him, my husband said, "Wow, that's nice! I didn't expect you to make one that nice!" Haha!


My mom played a HUGE role in making this quilt. I don't know what I'd do without her. Oh wait, she lives across the country... sad. But I was visiting her while I was making this and she helped me out a ton. 

So here's the step by step on how to make this quilt.

1. First, cut your fabrics into strips. Obviously, I only used two different fabrics to create the zig zag effect. I believe my strips were 3 inches wide.
2. After you cut them into strips, cut them into a rectangular shape. I believe these were cut into 4 inch lengths. It may have been 5. Just play around with how big you want yours.
3. Once you have both fabrics cut, sew them together like in the picture. Iron them flat afterwards.

4. Next, arrange them to create the zig zag pattern. Make sure you don't get to ambitious and sew too many... we did that and took too many of the rectangles away and it took us forever to figure out how to put it back together!
5. We did a lazier version of quilting. I cut a piece of batting to the size of the top and some fabric that same size. I then layered them. The sequence of the layering is VERY important! You need to layer it with the batting on bottom, then the top (right side up), then the back of the quilt (right side down). Sew around most of the square, leaving about a 12 inch gap so you can turn it right side out.
6. After you've turned it right side out, then hand stitch the quilt closed. Then all that's left is to top stitch and make it pretty and puffy!


I wrapped it up for its new home!


Sharing here: Winthrop Chronicles, Homemade Ginger, Ginger Snap Craft, Lil Luna, DIY Dreamer, Love and Laundry, One Artsy Mama, See Vanessa Craft, Craftomaniac,