Image Map

Wednesday, May 30, 2012

Summertime Wreath (tutorial)

Is it summertime yet?! :)

I loooove summer. Suntans, ice cream, pool parties, smores, and more.

I've had a laaame wreath hanging up on my door for the past couple of weeks and with summer right around the corner, I needed something peppier on my door.

Enter the Summertime Wreath.


Ahhh, that's better! A nice lil bow and a slice of watermelon... summer-tastic!


Here's how I made it:


1. Cut out two half circles out of felt.
2. I free-handed what I wanted on my felt.
3. Start embroidering! I'm definitely not an expert on this, but I like the look :)
4. To reinforce the back, I used (of course) a cereal box. It worked perfectly. I glued it on with regular ol' craft glue
5. I hot glued some floral wire to the back so I could attach it to the wreath.


1. I cut an 8.5 x 11 sheet of felt in half. I also used a small strip for the center.
2. With one of the large strips, take the edges and fold them to the center. Hot glue them in place.
3. Hot glue that part to the center of the other large strip.
4. Squish it up and hot glue the sides to the middle section.
5. Wrap the small strip around the middle of the bow and glue it in place!
6. (Not pictured) Cut the sides to make them pointy looking.  I also glued some floral wire to the back so I could attach it to the wreath.


Sharing here: Ginger Snap Crafts, Lil Luna, Rae Gun, Southern Lovely, The Johanson Journey, 36th Ave, 52 Mantels, Seven Alive, Gluesticks, Katie's Nesting Spot, One Artsy Mama, Mommy by Day, Crafter by Night, Cherished Bliss,       

Tuesday, May 29, 2012

Guest Post: Robin from Garage Sales 'R' Us

I'm super excited to have a fun girl guest blogging for me today. Her name is Robin and she creates over at Garage Sales 'R' Us. She shares lots of her garage sales finds plus some awesome projects!

Here are a couple of ones I LOVE:

Farmhouse Table

Mod Podge Dresser

DIY Chandelier

We were contestants in the One Crafty Contest. I'm out of the competition but Robin is still in! She's here to share with us her projects for Round 2!
*************************


This week for my One Artsy Mama Craft Contest the topic was mod podge. I had plans for every other topic of the contest except this one. Since I sent in my mod podge dressers (Click Here to see them) to make the top 20 to be able to compete I was not sure what I would do for this project. I didn't know if I wanted to do another dresser or even what dresser I would use or if I wanted to do something else. I knew my sister-in-law had the cutest little antique vanity in her garage she was wanting to redo. However she is about 38 weeks pregnant and didn't know when she would get around to the dresser so I asked her if I could redo it for her. After talking with her about it I had my project decision! Here she is.

It has been a while since I had seen the vanity and I thought I wanted to replace the hardware but when I saw it again I LOVED the existing hardware and decided to keep them the way they were.


 To start the project I headed to the scrapbook paper store with a little something in mind. I wanted to use a paper that had some really pretty cursive writing on it. I found a really pretty blue script paper that was perfect! So I came home and gave the vanity a fresh coat of paint. I used an off white paint.

Here is the mirror.

After my paint was on it was time to mod podge. I took the existing hardware off of the drawer fronts. These handles were not a normal bolt and screw handle. After looking at them I was a little worried I would not be able to take them off but I went and got a rubber mallet and gave them a few hard taps and they came out fine.

Then I started to mod podge my paper on. When you are mod podging scrapbook paper on to anything you want to put a thin layer of mod podge on and then immediately  start rubbing the air bubbles that form under your paper. I have a vinyl applicator that I like to use but if you don't have this a credit card will work fine.

 For a more in depth tutorial on how to mod podge paper onto dresser drawer fronts (Click Here) 

After my paper was on I took a medium girt sanding block and started to rough up the edges of the vanity to give it some age.


I love the look of aged furniture. Here is a picture before aging 


Here is a picture after using my sanding block to age the wood. It adds so much character!

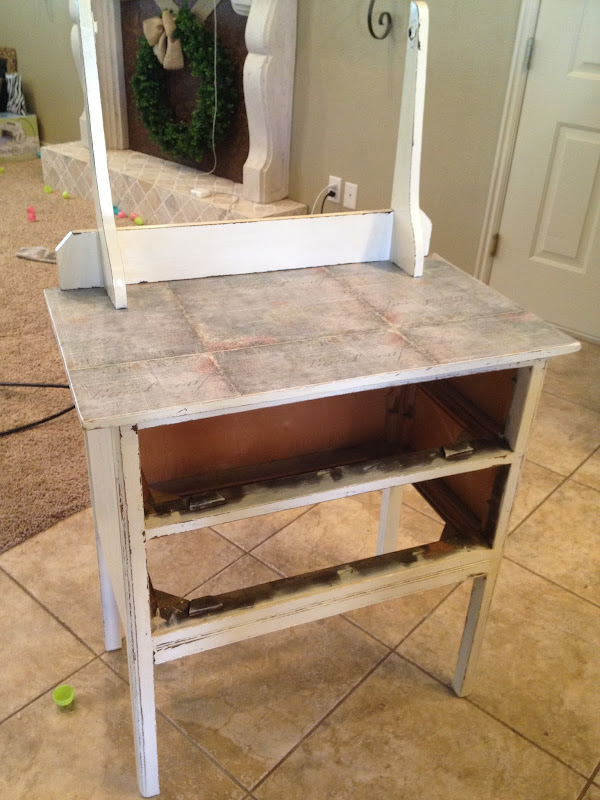
Here is my dresser after all my paper is on.


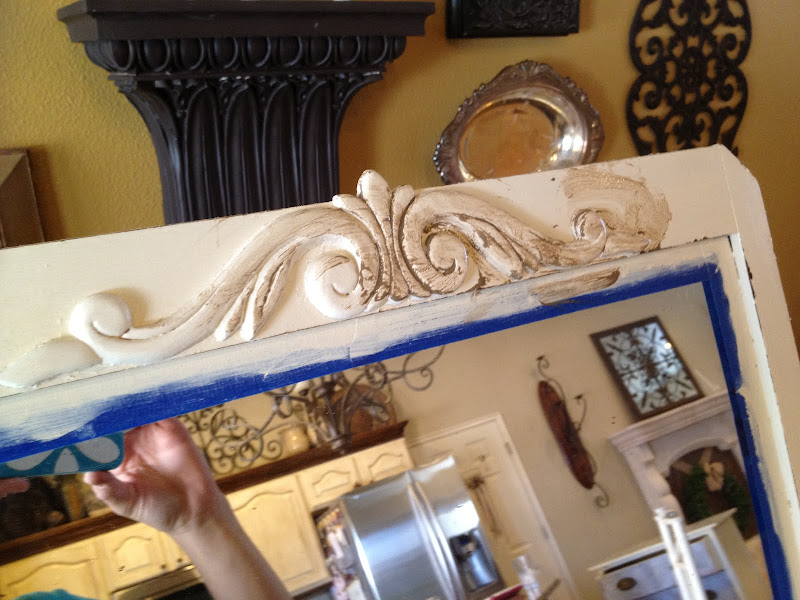
Now for the mirror there was an imprint of where an old wood embellishment had been. It didn't look good just painted so I ran to Lowes and bought one of their wood embellishments to put on. 


 The wood embellishment comes as unfinished wood so I gave it a coat of paint, added some wood glue to the back, secured it in place with a C clamp and let it sit for a few hours. 

After it was dry I added a little bit of glaze to the detailing. 
 Then I used my sanding block on the mirror and then screwed my mirror back on. Don't forget that after aging your wood you need to seal it with a polyurathane! After you give your project a coat of polyurathane it may feel sticky. If it does take a fine girt sanding block or sand paper and sand it down. This will take the sticky feeling out of your project.

 Here is my before again.

  After


I LOVE how it turned out! I am actually really sad that I have to give it back now! The decor of top of the dresser is from garage sales! The white statue was given to me by my mom who found it at a garage sale for a few bucks. The little vintage perfume bottle I found at a garage sale for $1 and the old teal rusted pot was also $1 at a garage sale.
**************

Awesome! Thanks so much Robin! For more of the Mod Podge contestants, go HERE.


Sunday, May 27, 2012

Destination: Cutesy Monday (#18)

Hello friends!!

I hope you've had an AWESOME week. This weekend has been so great...lots of swimming and relaxing.

Even though we're on vacation, I hope you're up to showing me what you've been making.

Here are some ah-mazing projects from last week:

by Creatively Living


by Anna Nimmity

by Nifty Thrifty Things


by Color Me Domestic

Awesome job, ladies!!

My RULES:

- Please link up NEW projects!
- Link back to me somehow
- Show other links some LOVE!


Friday, May 25, 2012

Peanut Butter (Dark) Chocolate Chip Cookies

Peanut Butter + Chocolate

Is there a more heavenly pairing?

I think not.

I pulled out a jar of creamy PB the other day from my pantry and just happened to look at the expiration date. It was going bad in, like, 4 days!! I had to use it, fast! What better to make with it than something scrumptious?

Not only did I use chocolate chips, but DARK chocolate chips.

If you have a craving for PB & chocolate, make these. And then you will be happy.


Peanut Butter Dark Chocolate Chip Cookies


1 cup unsalted butter
1 cup peanut butter
1 cup white sugar
1 cup brown sugar
2 1/2 + 1/4 cup flour
1 tsp baking powder
1/2 tsp salt
1 1/2 tsp baking soda
Dark chocolate chips, as desired


Cream together butter, peanut butter, and sugars. In separate bowl, sift together dry ingredients. Stir into wet ingredients. Put batter in fridge for 1 hour. Roll into 1-inch balls. Bake at 375 for about 10 minutes.


*This recipe doesn't call for eggs, so the cookies are a little crumbly. But you could easily throw some eggs in the batter if you wish. 


Enjoy!!

Sharing here: 30 Handmade Days, It's a HodgePodge Life, One Artsy Mama, What About, Nap Time Crafters, The Shabby Nest, See Vanessa Craft, Crafty Cousins, TT & J, It's Overflowing, I Heart Naptime, Lolly Jane, Young and Crafty, Positively Splendid, Winthrop Chronicles, Mommy by Day Crafter by Night, Cherished Bliss,         

Wednesday, May 23, 2012

Kaleidoscope Quilt

My wonderful little brother is currently in the Philippines serving a mission. He JUST passed his year mark. My mom had a stash of fun boy fabrics on hand, so I decided to make a quilt for when he comes home. He'll go & live in Utah after his mission, so he needs a big, warm quilt!

I saw this Kaleidoscope pattern on Cluck Cluck Sew and I fell in love! But it's a LOT of cutting!


Here's my top pieces all cut and ready to be sewn together:


That's 168 green & white triangles, 168 different fabric kites, and 42 circles. Phew! That took forever! I think I bruised my hand from all the cutting :)

Off to go start the sewing process!!
*************

Here's some quilty eye candy

Boxed Zoo Quilt by JAQS Studio

Zig Zag Quilt By Renae Hill
Ocean Chevron Quilt by Stars & Sunshine
Eli's Wheel Quilt by Moda Bakeshop
Little Apples Ric Rac Quilt

Tuesday, May 22, 2012

Features!

I promised I would do the features for last week's party today, so here it is! I always LOVE seeing all the projects and creativity. Thank you all so much for hanging out with me every Monday :)

Here are some AWESOME projects from last week:

by Shabby Gals

by The Happy Scraps

by The Brown Eyes Have It

by Cookin' Up Good Times

Thanks so much ladies! And I'll be doing the regular features next Sunday for this last link party. Come back tomorrow to see why my back and hands hurt :)

Sunday, May 20, 2012

Destination: Cutsey Monday (#17)

Hellllllo!!!!

Ready to PAR-TAY??

So, as I'm typing, I JUST finished my project for the One Crafty Contest at One Artsy Mama. Annnnd it's due at 8 in the morning. Yikes! I'm going to have to wake up early to take pictures and edit them and send them! I promise I didn't wait until the last minute. I made something completely different and it totally didn't work. So I had to start over.

Annnnyway, because of all the craziness, I'll be featuring projects from last week's party on Tuesday. Sound good?

Show me what you've been up to!!


Thursday, May 17, 2012

Boy Scripture Case

I recently made a scripture case for a boy in my ward that was getting baptized. It was hard to think of how to make a bag for a 9-year-old. I didn't want to make it look like a purse. Here's what I came up with:


  And here's how to make your own!

1.
Cut out your pieces.
I used 9x10 inch pieces of fabric- 2 pieces for the outer fabric and 2 pieces for the inside fabric. You may need to adjust if your scriptures are smaller/bigger. I cut 2-10 inch pieces for the handles. For the decorative band on the front, I cut a 3 inch by 11 inch of fabric. I also decided that I only wanted a stripe on the front, so I didn't use both pieces that I took a picture of.


2. 
What you'll do is make each side and then sew the two sides together to make the bag. For each side sew the right sides together along the top and sides. Remember to sandwich the handles to the top of each side.


3. 
On the front panel, if you decide to do a decorative stripe, remember to sew that on before you sew those 2 sides together. Just iron down the long sides twice (about 1/4 inch each time) and pin them to your panel and sew it!


4. 
Once you've sewn each side and turned them right side out, then sandwich them together with the right sides touching and sew the three sides together.


5. I had the raw edge on the bottom of the bag, so I cut them with pinking shears to reduce fraying.


Turn right side out and you have yourself a Boy Scripture Case!

I think the things to remember for a boy scripture case are:
1. Don't make long handles. It makes it seem more purse-like. 
2. Use neutral or boyish colors and fabrics. 
3. Don't make it too big. Boys are all about simplifying the things they have to carry.


Sharing here: 36th Ave, Katie's Nesting Spot, Gluesticks, Seven Alive, 52 Mantels, Fireflies & Jellybeans, Naptime Delights,